 |
| Latest Update 2nd February 2020. This page shows how to build a highly productive organic vegetable growing system which minimises water consumption and uses little more than homemade compost to maintain fertility. |
 |
| The first
step is to
dig down about 75mm below the ground chosen to install the Ecobed. The soil is cleared away to a holding area elsewhere in the garden, and returned later for use in the Ecobed. A layer of plastic weed-mat is placed over the exposed soil to help keep weeds and invasive roots out of the Ecobed, and a layer of finely crushed rock is applied on top as a foundation for the bed. Make sure this foundation is as level as possible since its important to keep the tank water level inside the Ecobed. The pile of reddish brown crushed volcanic rock (in the photo) is 20mm drainage Scoria and it's used in the Ecobed's water tank to support the soil above it (see more later). |
 |
| Nine sleepers each 3m long x 200mm wide x
75mm thick are required to construct the Ecobed's walls . Six of them were cut 2.7m long and 3 of them in the middle to make six 1.5m lengths. They were all painted with two coats of high quality external water based acrylic paint in light colours so excessive heat is not absorbed in summer, and to seal the tanalised Ecowood's surface. Although benign (copper based) I'm especially keen to isolate the preservatives in the wood out of the soil in my Ecobeds. |
 |
| The light brown sleepers are joined at the corners using 125mm galvanized
bugle head wood-screws (2 in each corner). The
short sleepers are screwed inside the long ones to produce an external bed dimensions of 2.7m x 1.65m. A sheet of heavy duty shadecloth is stapled to this base layer, which is then turned over so the shadecloth is in contact with the ground as shown. It protects the polythene sheet used to contain the Ecobed's water tank from sharp objects in the ground and potential root invasion from elsewhere in the garden. Use a spirit level to ensure the walls are perfectly level. Rake the gravel again if the levels need adjusting. |
 |
| The next level of sleepers is attached to the base by nailing the end sleepers in place using 100mm galvanised bullet head nails as shown above. The side plates are then screwed into position just like the base with 125mm screws. |
 |
| One of the side sleepers is drilled with a 50mm hole saw centred 500mm from one end and centred 75mm above the bottom of the sleeper. This hole is for the overflow pipe through which excess water is discharged when the tank is over filled. The overflow can be located at any corner of the Ecobed so thought is needed to ensure it is accessible for tank filling etc. The height of the overflow determines the depth of the water tank (250mm). |
 |
| You can see the overflow hole at the far end of layer 2 in this picture. |
 |
| The
200um builders plastic sheet used to line the Ecobed's water tank is a standard 2m wide, and just wide enough to cover the bottom of the tank and 250mm up
each side. Length is not a problem and the end walls can be covered
right up to the top. Two layers of this plastic are used as added protection against leaks, and a curtain of plastic is applied over the side wall timbers where they are still exposed. This layer is not used to extend the water tank but it helps protect the soil from exposure to the timber's preservatives. |
 |
| With all the liners in place, 50mm slotted irrigation tube is cut to length and laid around the inside perimeter at the bottom of the water tank. This distributes water quickly when the tank is being filled, and adds a little extra water capacity by displacing Scoria. This irrigation tube is corrugated with the slots in the bottom of each ridge. The corrugations keep the Scoria away from the slots so that they don't get blocked. |
 |
| The filler/overflow components are fitted loosely to the distribution tube to mark the height of the overflow outlet. The outlet assembly is moved down the filler tube until it lines up with the hole in the bed wall (easily felt through the plastic). |
 |
| A 38mm hole is drilled in one side of the filler pipe, at the marked position, and the tee connector glued into position using clear silicone sealant. |
 |
| A second tee connector is glued to the bottom of the 700mm long filler pipe and set at 90 degrees to the overflow tee connector. The 100mm long overflow pipe is glued into position as shown above. They are left a couple of days so the silicone sets firmly. |
 |
| The
water level indicator is made from a length of 6mm Tasmanian oak
dowel. At one end of the dowel, a table tennis ball is fixed in place using a blob of
silicone sealant. The silicone is "feathered" around the bottom of the ball and
along the dowel to provide a strong bond between the two components. When the silicone is completely set, the dowel is cut to its final length of about 600mm. (leaving 75mm of the indicator showing above the filler pipe cap when the tank's empty). The device is painted yellow, and the empty position marked in black (just above the filler pipe's cap) when everything is in position. The filler pipe's cap has a 7mm hole drilled in the top to guide the indicator as it rises and falls with the tank's water level. It also keeps unwanted pests out of the water tank. |
 |
| Its most important to make sure the top edges of the main sheets are kept above the overflow height of the water tank when stapling them in place. |
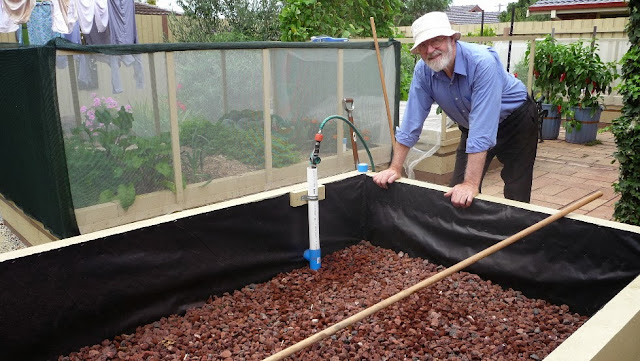
This photo shows drainage Scoria being added to the water tank, and leveled with the water when the tank is full to overflowing.
As you can see the filler system has been installed and fixed to the bed wall using a galvanized saddle clamp and a timber packer. They secure the system and keep the filler tube vertical.
The hose used to fill the Ecobed's water tank has an in line valve and extension tube. It allows the water supply to be quickly turned off when the tank overflows and the tube extension reaches past the overflow pipe to avoid water loss during the filling process.
 |
| Here's a fully operational Ecobed being filled (to overflowing). Note the valve on the hose connector allows the water supply to be turned off at the delivery point. No water is wasted since it is collected in a tray and poured back into the bed where it is absorbed in the soil. |
 |
| A layer of heavy duty shadecloth keeps soil out of the water tank. Note the shadecloth is oversize allowing an overlap of about 100mm all round to secure the edges. |
 |
| The soil is kept inside the overlap when filling the growing area. |
 |
| The
Ecobed is filled with soil to about 100mm from the top, and the water
tank filled to overflowing. After allowing the soil to settle
overnight as it absorbed water from the tank, 60mm of
homemade compost is added as a top dressing (compacts down to 50 mm in a day or 2) and covered with 50mm of organic
sugar cane mulch . The depth of soil and compost is about 300mm, which is an adequate depth for the roots of most common vegetables, and within range of the column of moisture wicked up from the water tank. The remaining 50mm of mulch cuts evaporation and helps the compost stay moist and biologically active. Worms are harvested from other garden beds and added to the new bed to ensure its population of worms and soil microbes get a good start as they feed on the compost. The self adhesive copper tape being applied around the Ecobed in the photo is an excellent deterrent against slugs and snails, however its important to guard against inadvertently bringing these molluscs into the bed as eggs in compost. (Note** mollusc eggs do not survive in a hot compost). |
 |
| This photo shows the pest exclusion frame partly built. The bottom rail is screwed into the bed wall along with 6 vertical supports made from 65mm x 19mm x 900mm untreated pine timbers, and 4 similar vertical supports made from 42mm x 19mm x 900mm timbers. They are spaced evenly along each side. |
 |
| The
reason for using 65mm wide uprights in the centre of the sides
frames is to allow me to use 2 short pieces of timber for the top side
rails instead of one long one. My car can easily carry these short
lengths from the hardware store, but not the 2780mm pieces otherwise
required. The fixings are 75mm galvanised countersunk wood screws, and the top rails and cross bearers are 42mm x19mm untreated pine. |
 |
| I use 50mm galvanised countersunk wood-screws for this fixing at the bottom of the 65mm centre verticals. |
 |
| The other four 65mm vertical supports are mounted in the corners and fixed as shown above. The blue plastic sleeve on the end of the overflow tube holds a piece of exclusion netting in place. The netting keeps pests like mosquitoes out of the water tank. |
 |
| The top fixing of the corner uprights works well using 75mm galvanised countersunk wood-screws. |
 |
| Here is a view of the pest exclusion frame in place. Its been painted in situ using the same type of paint as the sleepers. |
 |
| The bottom rail is pre-drilled for the 30mm galvanised bullet head nails used as hooking points. |
 |
| These hooking point nails are hammer in at 150mm spacings (extra ones in the corners) leaving the head and about 7mm of nail exposed. This position is ideal because the fabric is stretched over the edge of the bottom rail keeping it tightly sealed against pests. |
 |
| Here
is the completed Ecobed with exclusion netting fitted. I use a lightweight net (20% shade factor) in pieces 2850mm wide. It allows a single
piece of net to be run from the hooking points on one side of
the bed, over the top of the frame to the hooking points on the other side. To keep this sheet taught longitudinally, upward facing hooking points are fixed along the tops of both end rails at 150mm spaces. This leaves the ends of the bed unprotected, so a piece of net is cut, big enough to cover them allowing an overlap at the top and bottom of about 30mm (beyond the hooking points). This secures the top and bottom of each end sheet, but leaves the sides of each sheet with a loose overlap. 2 additional hooking points are fixed in the top of the side rails at each corner so the overlap can be anchored securely round the corner. There are no hooking points mounted horizontally to snag on cloths and bare skin, but care should be taken with the upwardly exposed nail heads partly embedded in the top rails. These nail heads are rounded and are unlikely to cause any damage, but please take care, if you use this system. |
No comments:
Post a Comment